
You’ve just purchased a new aftermarket stereo head unit for your 2004/5 Miata with a Bose system, and you’re itching to Installing Aftermarket Stereo With Bose System.
But before you dive in, you need to know what tools and equipment are required, how much it’ll cost, and the steps involved in the installation process.
Don’t worry – we’ve got your back! In this post, we’ll walk through everything you need to know about installing an aftermarket stereo with a Bose system.
We’ll also share some tips on how to troubleshoot sound issues if they arise – like the one that’s been bugging you with your Envoy XL. So sit tight and let’s get started!
Table of contents
Simple Steps For Installing Aftermarket Stereo With Bose System:
Step 1
Remove the old Factory Stereo.
Step 2
Clear the Port.
Step 3
Plug the connectors with the line output converter.
Step 4
Connect to the New Aftermarket Stereo unit.
Step 5
Installation testing.
Step 6
Finally, Fix the Head Unit…!
Preparing for Installation:
Before diving into the installation process, it’s important to prepare for installing an aftermarket stereo with a Bose system.
This will ensure that you have everything you need and avoid delays or issues during the installation.
Gather all of the required tools and equipment, such as a wiring harness adapter, factory radio removal tools, dash kit, screw pack, and receiver wiring. Make sure you also have any additional accessories needed to connect your new stereo with your factory Bose system.
To prevent electrical shock or damage to your new stereo or vehicle, always disconnect the negative battery terminal before starting any work on your car. It’s also crucial to locate the proper location for power and ground wires before connecting them during installation.
Gather Required Tools and Equipment:
Before you start installing an aftermarket stereo with Bose system, it’s important to make sure you have all the required tools and equipment.
This will ensure that the installation goes smoothly and without any unnecessary delays.
Some of the essential tools and equipment you’ll need for installing an aftermarket stereo with a Bose system include:
- Stereo system
- Output converter
- Dash kit
- Screw pack
- Factory radio removal tools
- Receiver wiring harness
Make sure to choose the right size dash kit that fits your particular vehicle model, year, and location.
Also, be mindful of the power and ground wires as they are necessary for proper functioning of your stereo system, antenna installation also needs attention during this step too.
By gathering all these required tools in advance, you can save yourself time in running back and forth to get additional parts or wasting time trying to figure out what is missing.
Disconnect the Negative Battery Terminal:
Before starting with the installation process, it is crucial to ensure safety. Safety should always be the top priority when dealing with electrical components like radios and stereos.
To begin the installation, disconnecting the negative battery terminal is a critical first step to avoid any electric shock or short circuits that could damage either your new stereo or your car’s electrical system.
This way, you can guarantee that no wires will be carrying electricity while you work on them.
Once you have disconnected the battery, make sure to place something over the negative battery terminal.
You don’t want any accidental contact between bare metal and a charged wire as this may cause permanent damage both to your stereo system and yourself.
After disconnecting the battery, proceed with removing old hardware from your car while following all safety precautions necessary for proper handling of wiring harnesses, splicing terminals, etc., and then move onto wiring for new devices!
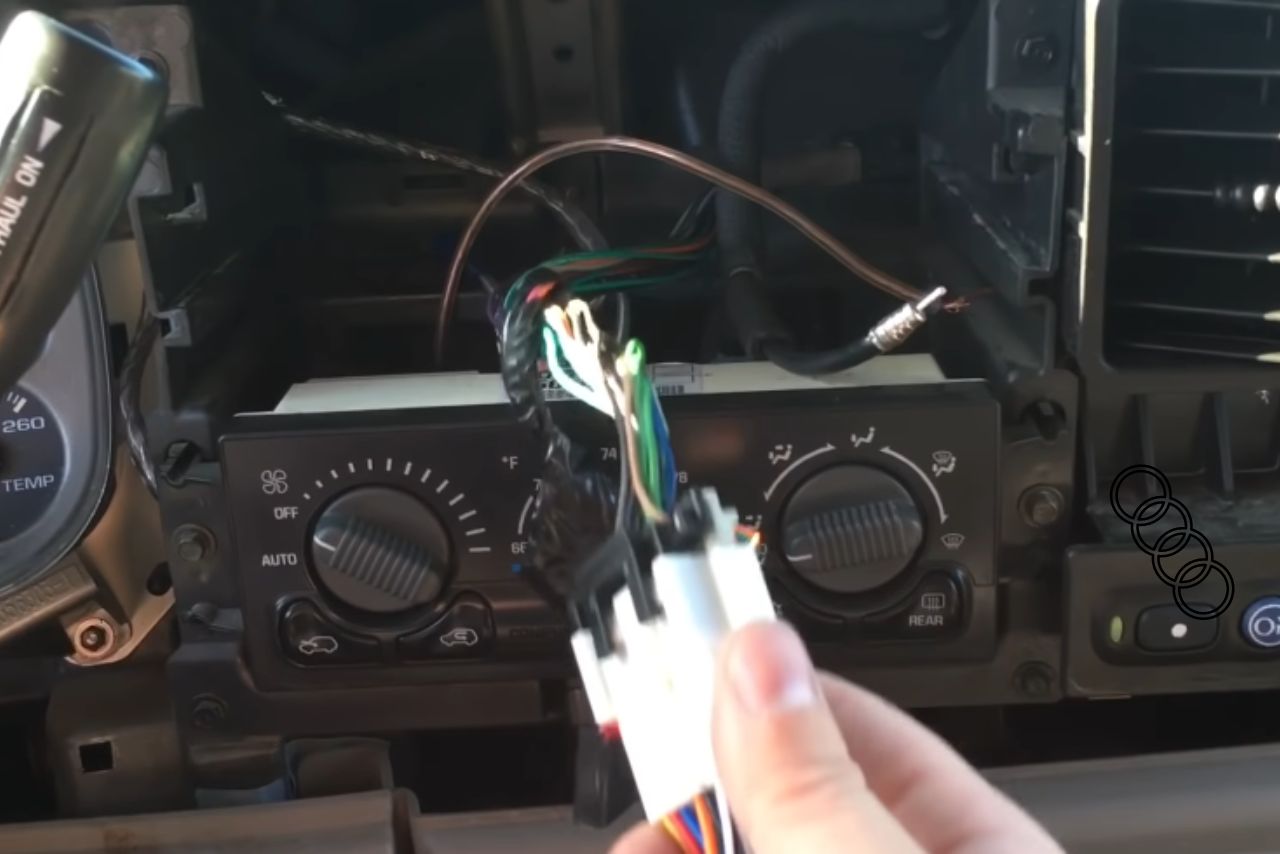
Removing the Factory Stereo System:
Removing the factory stereo system is a crucial step in installing an aftermarket stereo with Bose system.
- To remove the old radio, you first need to locate it.
- The location of the radio varies depending on different car models, but it’s usually found in the center console or dashboard.
- Once you find it, you’ll need to disconnect the wires that connect it to your vehicle’s power and ground system, audio speakers, and antenna.
- It’s important to use caution when removing these wires as some of them may be fragile or difficult to reach.
- Using factory radio removal tools can make this process easier and less damaging.
- These tools are designed specifically for safely prying off dashboard trim panels without scratching or breaking anything.
- After successfully removing the old stereo system, carefully inspect all wires for any damage that could interfere with proper functioning of new head unit harnesses.
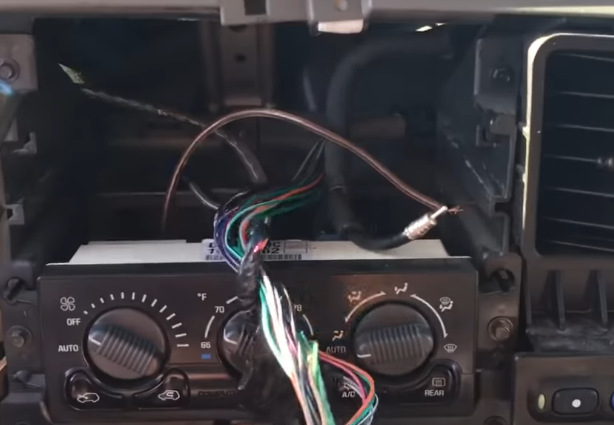
Remove the Dashboard Trim Panel:
To access the factory stereo system, the dashboard trim panel needs to be removed. This can be done using a screwdriver or other appropriate tool to remove any screws or clips securing the panel in place.
Be sure to take note of any wires or cables that may be connected to the panel and carefully disconnect them before fully removing it.
Once you have removed the dashboard trim panel, you should have clear access to the factory stereo system.
- Use factory radio removal tools, if necessary, to gently pull out the unit without damaging any wires or components.
- Take care not to force anything during this step as it could cause damage to your vehicle’s wiring or other electronic systems.
- With the factory stereo system removed, you are now ready to move on with installing your aftermarket stereo with Bose sound system.
Make sure you have gathered all necessary equipment and tools required for installation, including a wiring harness adapter specific for your vehicle’s make and model.
Properly removing the dashboard trim panel is crucial in successfully accessing and removing your vehicle’s existing stereo system.
By taking care in this step of preparation, installing an aftermarket stereo with a Bose sound system will naturally follow suit.
Remove the Factory Stereo System:
Removing the factory stereo system can be a bit tricky, but with the right tools and approach, it can be done easily.
Firstly, using the factory radio removal tool is essential to avoid damaging your dashboard or stereo system.
You would also need to disconnect all the necessary wires from the dashboard and ensure that they are labeled accordingly to make installation easier later on.
Before anything else, locate where in your car your steering wheel controls and antenna are located as these may vary depending on your car model.
Once you’ve successfully removed all of these parts for the original stereo system, you can proceed to install your new aftermarket stereo head unit in its place.
It’s important that you use an appropriate adapter harness when connecting your new audio equipment so that it properly connects with the existing wiring without any complications.
Remember to connect both power and ground wires for optimum audio output quality.
Lastly, remember to test out everything before securing everything back into place – especially if this is one of your first posts about installing a new sound system.
This includes ensuring all plug-ins have been attached correctly as well as making sure there aren’t any loose parts or pieces still dangling somewhere within reach of passengers while driving!
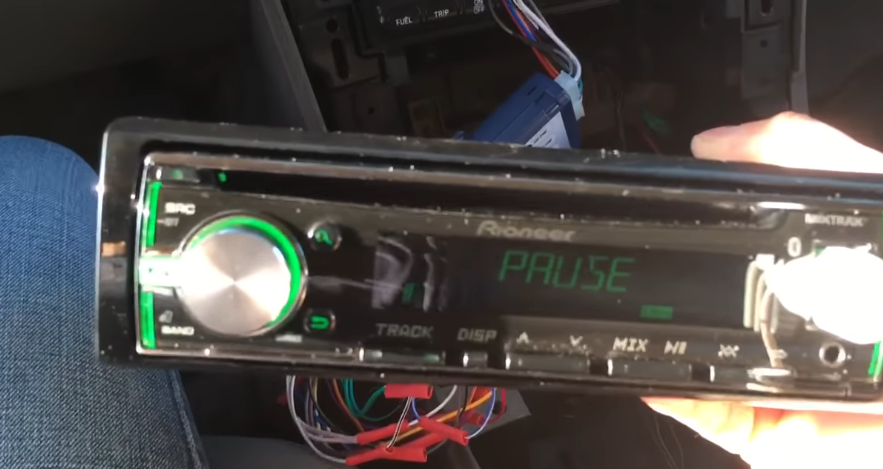
Connecting the New Aftermarket Stereo with Bose System:
Wiring Harness Connections:
The wiring harness is an essential part of the installation process when installing an aftermarket stereo with a Bose system.
The harness allows you to make the necessary connections between the new stereo and the car’s existing wiring.
First, locate the factory wiring for your car’s stereo. This will typically be located behind the dashboard or in the console area.
Next, connect the appropriate wires from your new aftermarket stereo harness to the corresponding wires on your car’s factory wiring harness.
Be sure to follow any specific instructions that come with your particular adapter or kit.
It’s important to ensure that all connections are secure and properly insulated using electrical tape or wire connectors.
Make sure you are connecting power and ground wires correctly as well as other relevant audio and antenna wires naturally.
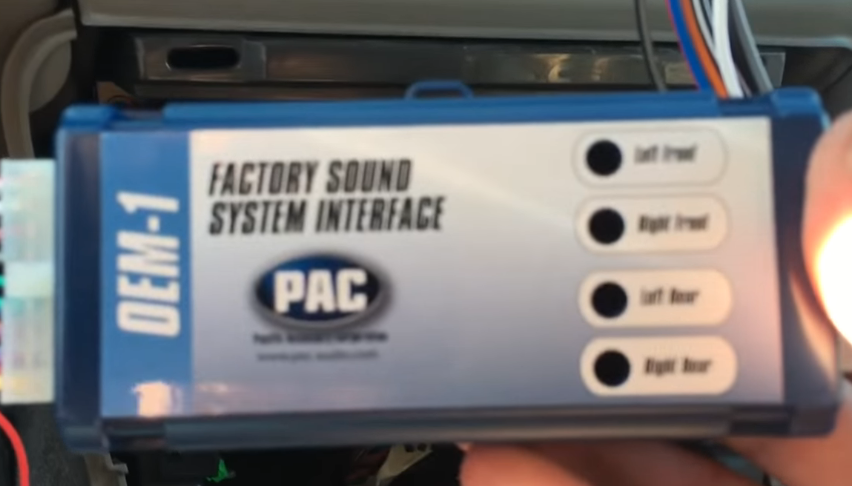
Remember that, if required by your installation setup, some additional adapters may need to be used like Scosche SLC4 Line Output Converter (if working specifically with Bose sound systems).
Always refer back to any posts online regarding model-specific installation guidelines as these can sometimes vary based on location or engine type.
When it comes time to test everything out, double-check all of your connections before turning on power so you have steering wheel controls installed correctly for easy usage!
Connect the Bose System with the New Stereo:
Connecting the Bose system with the new aftermarket stereo is a crucial step in the installation process.
- To do this, you’ll need to use an adapter harness that allows you to connect the factory Bose wiring to your new stereo’s wiring.
- One of the key things to keep in mind when connecting these wires is matching up colors and functions.
- Some adapters will come with labels or diagrams that can help guide you through this process.
- Once you have everything connected properly, test out your sound system before securing everything into place. You may need to adjust settings on both your stereo and amplifier to get optimal sound quality.
- Remember to also connect any other components like antennas and power/ground wires as well for a complete installation.
With all connections made, secure the new stereo unit and reassemble any dashboard trim panels or covers that were removed earlier.
If done correctly, connecting your factory Bose system should be seamless and provide excellent sound quality for your listening pleasure.
Securing the New Stereo:
Once you have made all the necessary wiring harness connections and connected the Bose system with your new aftermarket stereo, it’s time to secure the new stereo in place.
- First, test your new stereo to ensure that everything is working correctly. If you’re satisfied with the sound quality and other settings, use screws or locking mechanisms provided by your dash kit manufacturer to secure the head unit into its location on the dashboard.
- Ensure that all wires are tucked away neatly so they do not interfere with any moving parts or get snagged on anything inside your car. After ensuring everything is properly secured and safe, reattach any covers or trim panels that were removed during previous steps.
- Finally, reconnect the negative battery terminal which was disconnected before initiating any work on installing an aftermarket stereo with a Bose system.
With these steps completed successfully, you should now be able to enjoy high-quality audio from your upgraded sound system while driving!
Test the New Stereo:
Once the wiring and connections have been made, it’s time to test the new stereo. Turn on the power and make sure that everything is working as expected.
Check that all of the factory systems like steering wheel controls, sound system likes Bose or factory amp are still functioning properly with the new aftermarket setup.
A useful tip for testing audio quality is to use a naturally loud song in different genres to judge how well your new stereo performs across various types of music.
Test if all speakers are working correctly by playing sound from each location individually.
Also, ensure that there isn’t any unwanted static or interference in the sound output.
It might be necessary to adjust some gain knobs for optimal listening levels of your aftermarket stereo, especially when using a line output converter such as Scosche SLC4 Line Output Converter.
If everything sounds good and works flawlessly after testing, congratulations – you’ve successfully installed an aftermarket stereo with Bose or any other factory system! Now you can enjoy your favorite tunes while cruising down the road with confidence knowing that you did it right.
Secure the New Stereo in Place:
Now that you have successfully connected the new aftermarket stereo with the Bose system in your vehicle, it’s time to secure it in place.
This step is crucial as it ensures that your new stereo stays firmly fixed and doesn’t move around while driving.
To secure the new stereo, start by testing the sound quality and all other functions to ensure that everything works perfectly fine.
If everything checks out, then use screws or brackets (depending on the location of installation) to fix the unit in place.
Before securing the new head unit in place, make sure that all wires are properly organized and not blocking any vents or moving parts within your dashboard. Double-check if all connections are tight enough and correctly installed.
Additionally, don’t forget to connect back any antennas or power sources previously detached during preparation for installation.
Ensure proper grounding of all equipment used for this process follows standard procedure because improper grounding can cause electrical damage leading to a damaged system.
Overall, once done with securely installing your aftermarket stereo with Bose sound systems alongside ensuring that all pieces operate well together naturally without any issues should guarantee an enjoyable ride filled with high-quality audio playback right there in your car!
Finishing Up:
Now that you’ve connected the new aftermarket stereo with Bose system and secured it in place, it’s time to finish up the installation process.
Reconnect the negative battery terminal by attaching the ground wire to its original location.
Double-check all wiring connections and make sure everything is properly plugged into the harnesses.
Next, reinstall the dashboard trim panel by snapping it back into place. This may take a little bit of force, so be gentle but firm when pushing it in.
Finally, test out your new audio system and adjust any necessary settings such as equalizer levels or radio station presets.
Ensure that all steering wheel controls are functioning properly if you have them, and check that your antenna is also connected securely.
By following these steps carefully and using proper equipment like a Scosche line output converter as necessary, you can successfully install an aftermarket stereo with Bose system into your vehicle without compromising sound quality or functionality.
Reconnect Negative Battery Terminal:
Before finishing up the installation, it’s important to reconnect the negative battery terminal that was disconnected in the beginning.
This ensures that no power is flowing through the wires while you were installing your new stereo with Bose system.
Make sure to connect the black/negative cable first before connecting the red/positive one. This will prevent any electrical shorting from occurring and ensure a smooth power-up of your new stereo system.
Once complete, test everything out by turning on your new stereo and playing some music. Make sure that all speakers are working correctly, including those associated with your BOSE sound system.
Also, check if any steering wheel controls or other audio features are working correctly as expected.
If everything works fine without any issues or errors, re-installation of dashboard trim panel should be done by securing all necessary screws at their respective location along with connecting antenna cables properly to avoid any improper functioning of radio signals.
Reinstall Dashboard Trim Panel:
- Now that you have successfully installed your new aftermarket stereo with the Bose system and tested it, it’s time to put everything back together.
- The next step is to reinstall the dashboard trim panel that was removed earlier.
- Make sure all wires are neatly tucked away and not in the way of any moving parts or controls. Ensure that the steering wheel controls are functioning correctly if you have them.
- Reattach any other components, such as an antenna or power/ground wires, before securing the dashboard trim panel in place. Make sure there are no screws or clips left unattached before proceeding.
Once everything is securely reassembled, reconnect the negative battery terminal to restore power to your vehicle.
Turn on your new head unit and listen for audio output from each speaker location. If everything sounds good and functions properly, congratulations! You have successfully installed an aftermarket stereo with a Bose system in your car!
Can you install Bose sound system in a car?
Yes, you can definitely install a Bose sound system in your car. Bose is a world-renowned brand that specializes in high-quality audio systems for homes, cars, and other spaces.
Bose car audio systems are designed to deliver immersive, clear, and powerful sound that enhances the listening experience, whether you are driving to work or on a road trip.
With Bose car audio systems, you’ll enjoy crisp highs, deep bass, and balanced sound that makes your favorite music come alive.
Installation of Bose car audio systems is relatively straightforward and can be done by a professional or DIY enthusiast.
So, if you want to amplify the driving experience in your car with exceptional audio sound, look no further than Bose car audio systems.
Conclusion and final thoughts 💭
Installing an aftermarket stereo with a Bose system can enhance the sound quality of your car audio system significantly.
Although it may seem daunting at first, following the steps outlined in this post will guide you through the process and make it a lot easier to install.
Remember to disconnect the negative battery terminal before beginning any work on your vehicle and gather all necessary tools and equipment before starting.
Removing the factory stereo involves removing dashboard trim panels carefully, locating radio removal tools, splicing wires using proper wiring harnesses, and a line output converter.
When connecting the new stereo with Bose systems like on Envoy XL or other models from above list, be sure to connect all wires properly including power/ground wires and antenna connections.
Securing your new stereo in place after doing these things is straightforward using screws included in most kits for proper mounting location.
With proper installation technique and careful attention paid during each step along the way, anyone can upgrade their car’s sound system by installing an aftermarket stereo head unit with ease!
Leave a Reply