Honda Accord Check Charge System Message: (Fixed!)
Author:
Jack Oliver
Affiliate Disclaimer
As an affiliate, we may earn a commission from qualifying purchases. We get commissions for purchases made through links on this website from Amazon and other third parties.
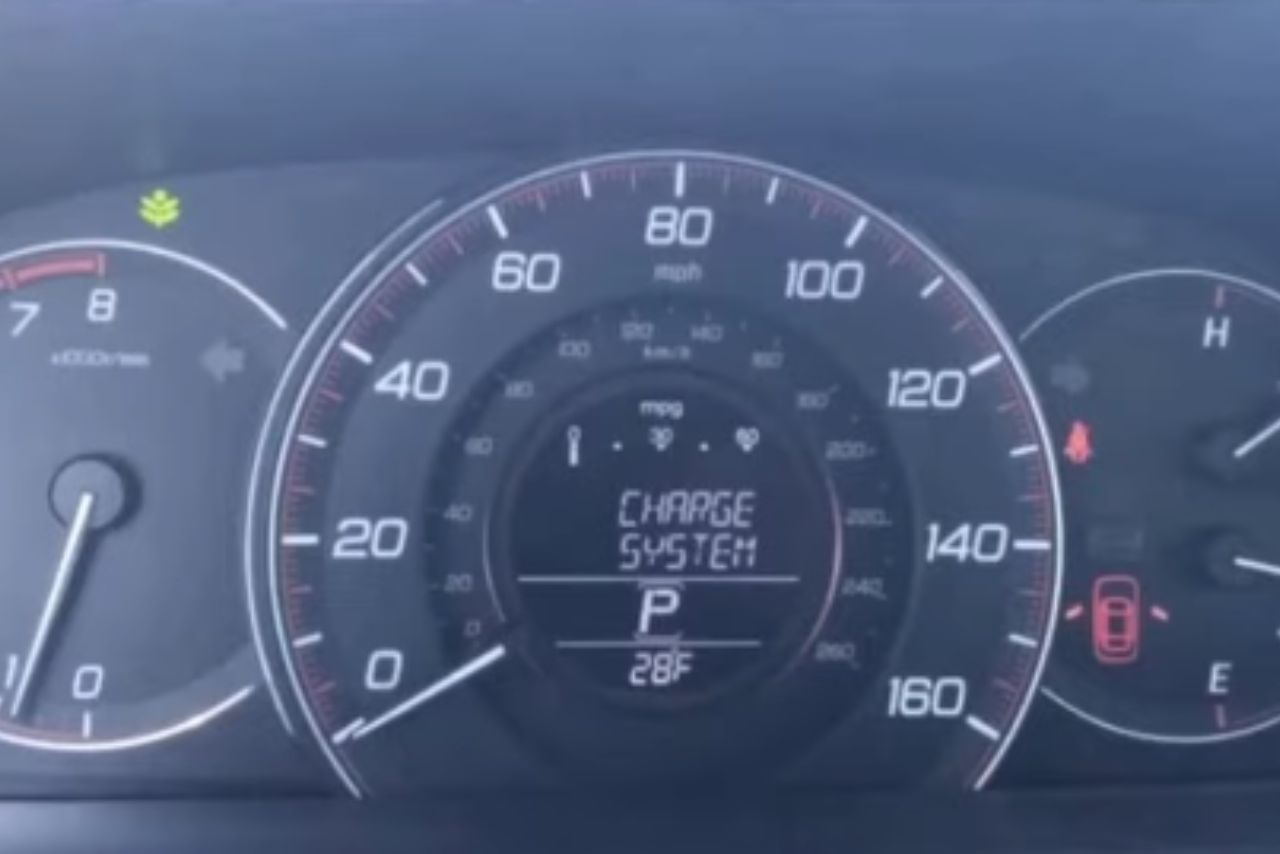
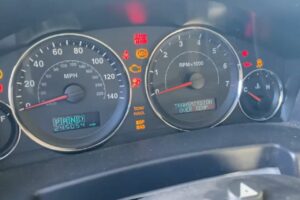
When you see the “Check Charge System” light illuminated on your Honda Accord, it’s a clear indication that there’s an issue with the car’s charging system. This system comprises various components, including the battery, alternator, electronic control unit (ECU), and the interconnected wiring connections. It’s essential to address this problem promptly to ensure that your vehicle operates smoothly and reliably.
The “Check Charge System” message can signal a range of potential problems. It could be due to a faulty battery, where it may no longer hold a charge or deliver sufficient power to the electrical system.
Alternatively, the issue may lie with the alternator, which is responsible for charging the battery while the engine is running.
A malfunctioning alternator can result in insufficient power supply to the vehicle’s electrical components, leading to various electrical issues.
Moreover, problems with the electronic control unit or the wiring connections can also trigger this warning message.
By understanding the possible causes and taking appropriate action, you can resolve the charging system issue and ensure the optimal performance of your Honda Accord.
Table of contents
The Honda Accord Check Charge System Message:
The “Check Charge System” light is a warning sign that something is not right with your Honda Accord’s charging system.
This system consists of several components, including the battery, alternator, electronic control unit (ECU), and the wiring connections that link them all together.
When this light illuminates on your dashboard, it’s important to pay attention and take action. Here’s what you need to know:
Battery Troubles: One possible cause for the “Check Charge System” message is a weak or faulty battery. Your battery might be old and losing its ability to hold a charge, or there could be a problem with its connections. A malfunctioning battery can prevent the alternator from charging it properly, leading to power issues in your vehicle.
Alternator Issues: The alternator is responsible for generating electricity and supplying power to the battery and the electrical systems of your car. If the alternator fails or is not functioning properly, it can cause the battery to drain and trigger the “Check Charge System” warning. In some cases, a faulty alternator may even damage the battery.
Wiring and ECU Problems: The wiring connections between the battery, alternator, and ECU are crucial for the charging system to work correctly. Loose or corroded connections can disrupt the flow of electricity and trigger the warning light. Additionally, issues with the electronic control unit (ECU), which manages the charging system, can also be a culprit.
If you see the “Check Charge System” light on your Honda Accord, it means there’s a problem with the charging system. This could be related to the battery, alternator, electronic control unit (ECU), or the wiring connections.
Let’s dive into the possible causes:
Faulty Battery: A weak or dead battery can trigger the “Check Charge System” message. If your battery is old or has been drained, it may not be able to hold a charge properly. This can be caused by leaving the lights on, a malfunctioning component, or simply due to the battery’s age.
Failing Alternator: The alternator plays a crucial role in charging the battery while the engine is running. If it malfunctions or fails, the battery won’t receive a proper charge. This can result in the “Check Charge System” warning. Signs of a failing alternator include dim headlights, a whining noise, or a battery that keeps dying.
ECU Malfunction: The electronic control unit (ECU) is responsible for managing various electrical systems in your car. If the ECU encounters a problem or fails, it can affect the charging system and trigger the warning light. This issue might require professional diagnosis and repair.
Wiring Issues: The interconnected wiring connections between the battery, alternator, and ECU can become loose, corroded, or damaged over time. Faulty wiring can disrupt the flow of electrical current, leading to charging system problems and the warning light activation. Inspecting and repairing the wiring connections may be necessary.
Sensor Problems: Your Honda Accord’s charging system relies on sensors to monitor voltage, current, and other parameters. If any of these sensors go haywire or malfunction, it can give rise to the “Check Charge System” message. Diagnostic tools are typically required to identify faulty sensors accurately.
Possible Causes
Faulty Battery
Failing Alternator
ECU Malfunction
Wiring Issues
Sensor Problems
Signs of a Battery Issue:
If you’re seeing the dreaded “Check Charge System” message on your Honda Accord, it’s important to pay attention to the signs of a potential battery issue. Here are a few things to look out for:
Difficulty Starting the Car: If you find that your Accord is struggling to start or takes longer than usual to ignite, it could be a sign that your battery is running low or failing.
Dimming or Flickering Lights: Have you noticed that your headlights, interior lights, or dashboard lights are flickering or appearing dimmer than usual? This could be an indication that your battery is not providing enough power to the electrical components of your vehicle.
Electrical Malfunctions: A failing battery can also lead to various electrical malfunctions throughout your Accord. For example, you may experience issues with your power windows, radio, or even the air conditioning system.
Corroded or Loose Battery Connections: Over time, battery connections can become corroded or loose, affecting the battery’s ability to charge properly. Check the battery terminals for any signs of corrosion or looseness and ensure they are clean and securely fastened.
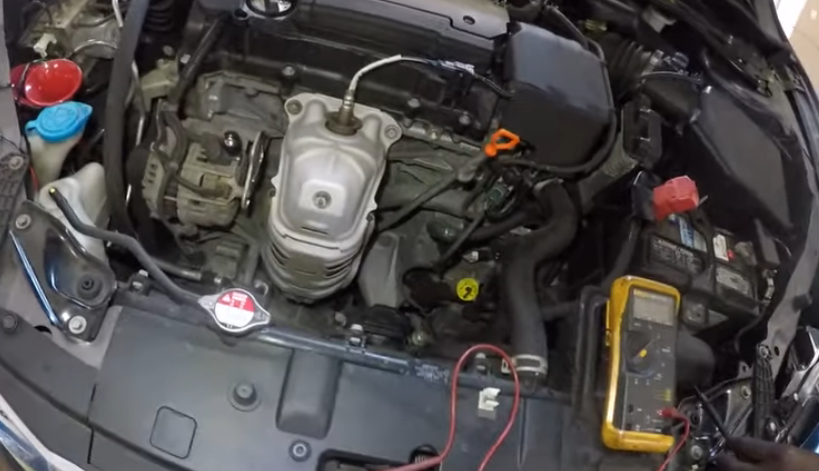
Here are a few steps you can take to diagnose problems with the alternator:
Check the battery voltage: Start by checking the voltage of your car’s battery. You can use a multimeter to measure the voltage while the engine is off. A healthy battery should have a voltage reading of around 12.6 volts. Anything significantly lower than that could indicate a problem with the battery or the alternator.
Inspect the alternator belt: A loose or worn-out alternator belt can cause charging issues. Inspect the belt for any signs of damage, such as cracks or fraying. Additionally, ensure that the belt is properly tensioned. If you notice any issues, it’s recommended to replace the belt.
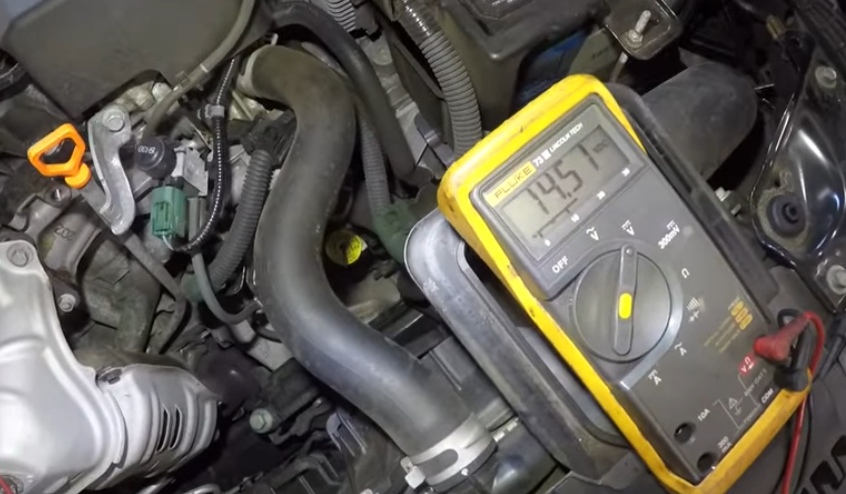
Test the alternator output: Connect the multimeter to the battery terminals while the engine is running. A fully functional alternator should produce a voltage reading between 13.5 and 14.5 volts. Anything outside this range may indicate a problem with the alternator’s output.
Check for loose connections: Sometimes, a loose or corroded connection can result in charging system problems. Inspect the alternator connections, battery terminals, and grounds for any signs of looseness or corrosion. Clean and tighten the connections as necessary.
Consider professional help: If you’re unable to diagnose the problem or if the alternator tests indicate a fault, it may be best to consult a professional mechanic. They have the expertise and specialized tools to accurately diagnose and repair alternator issues.
Step
Diagnosis
1
Check the battery voltage using a multimeter.
2
Inspect the alternator belt for damage and proper tension.
3
Test the alternator output voltage with the engine running.
4
Check for loose or corroded connections on the alternator, battery terminals, and grounds.
5
Consider seeking professional help if unable to diagnose or if the alternator tests indicate a fault.
Checking the Electronic Control Unit (ECU):
The Electronic Control Unit (ECU) plays a crucial role in the charging system of your Honda Accord. It acts as the brain, coordinating the various components to ensure efficient power distribution.
If you’re experiencing a “Check Charge System” message, it’s essential to check the ECU for any potential issues.
Here are a few steps to guide you through the process:
Inspect the wiring connections: Start by visually examining the wiring connections leading to the ECU. Look for any loose or damaged wires that may be causing a poor connection. If you spot any issues, it’s important to repair or replace the affected wiring.
Check for corrosion: Corrosion can hinder the ECU’s performance and disrupt the charging system. Inspect the ECU’s connectors for any signs of corrosion, such as greenish deposits. If you find corrosion, clean the connectors using an electrical contact cleaner and a soft brush.
Scan for error codes: Using a diagnostic scanner or code reader, connect it to the OBD-II port, usually located beneath the dashboard. Scan for error codes related to the charging system or the ECU itself. Note down any codes that appear and refer to the vehicle’s service manual for further guidance.
Reset the ECU: Sometimes, a temporary glitch can cause the “Check Charge System” message to appear. Resetting the ECU can help resolve such issues. To reset the ECU, disconnect the negative terminal of the battery for a few minutes. Reconnect it afterward, and start the vehicle to see if the message reappears.
Step
Description
1
Inspect wiring connections for damage or looseness.
2
Check ECU connectors for corrosion and clean if necessary.
3
Scan for error codes using a diagnostic scanner or code reader.
4
Reset the ECU by disconnecting the battery’s negative terminal.
Inspecting Wiring Connections:
When encountering a “Check Charge System” message on your Honda Accord, one of the potential culprits could be faulty wiring connections.
These connections are essential for the smooth functioning of the vehicle’s charging system, which includes the battery, alternator, and electronic control unit (ECU).
To address this issue, you can perform a thorough inspection of the wiring connections. Here are some steps to guide you:
Visual Inspection: Begin by visually examining the wiring connections in the charging system. Look for any visible signs of damage, such as frayed wires, loose connections, or corrosion. Ensure that all connections are secure and properly attached.
Clean Connections: If you notice any signs of corrosion or dirt buildup on the wiring connections, it is crucial to clean them properly. Disconnect the battery before cleaning to avoid any electrical accidents. You can use a wire brush or a cleaning solution specifically designed for electrical connections. After cleaning, ensure that the connections are dry before reattaching them.
Check for Loose Wires: Gently tug on the wiring connections to check for any loose wires. If you find any, tighten them appropriately. Loose connections can disrupt the flow of electricity and lead to charging system issues.
Inspect Harnesses and Cables: Apart from individual connections, inspect the wiring harnesses and cables that connect various components of the charging system. Look for any signs of damage, such as worn-out insulation or exposed wires. If you notice any issues, consider repairing or replacing the affected parts.
Electrical Testing: If you are unsure about the condition of the wiring connections or suspect an electrical fault, it may be necessary to conduct electrical testing. This can involve using a multimeter or seeking assistance from a professional mechanic who has the necessary equipment to diagnose and rectify the issue.
Ignoring this warning could lead to further damage to your vehicle’s charging system and potentially leave you stranded on the road.
Here are a few steps you can take to resolve the problem:
Check the battery connections: Start by inspecting the battery terminals for any signs of corrosion or loose connections. If you notice any issues, tighten the connections or clean the terminals with a wire brush. Ensure that the battery cables are securely attached.
Inspect the alternator belt: A worn or loose alternator belt could prevent the alternator from charging the battery properly. Check the belt tension and look for signs of wear or damage. If necessary, tighten or replace the belt following the manufacturer’s instructions.
Test the battery voltage: Using a multimeter, measure the voltage across the battery terminals. A fully charged battery should read around 12.6 volts. If the voltage is significantly lower, it may indicate a battery problem. Consider recharging or replacing the battery if necessary.
Visit a mechanic: If the battery and alternator seem to be functioning properly, it’s advisable to visit a qualified mechanic. They will have the necessary tools and expertise to diagnose and fix any underlying issues with the charging system. They may also check the electronic control unit (ECU) and wiring connections for any faults or malfunctions.
Action
Description
Check the battery connections
Inspect the terminals for corrosion or loose connections
Inspect the alternator belt
Check tension, wear, and replace if necessary
Test the battery voltage
Measure voltage using a multimeter, recharge or replace if needed
Visit a mechanic
Seek professional help for a thorough diagnosis and repairs
This light indicates a problem with the vehicle’s charging system, which includes the battery, alternator, ECU, and the wiring connections.
Here are a few key takeaways to remember:
Importance of addressing the issue: Ignoring the “Check Charge System” light can lead to further complications and potential breakdowns. It’s crucial to take action and have the system inspected by a qualified mechanic.
Possible causes: Some common causes for the light to come on include a faulty alternator, a weak battery, or issues with the ECU or wiring connections. A professional diagnosis is necessary to identify the exact cause.
Professional diagnosis: When facing a charging system issue, it’s best to consult a certified mechanic who has the knowledge and tools to diagnose and repair the problem accurately. They will be able to perform tests and inspections to determine the root cause.
Regular maintenance: To prevent charging system issues, it’s essential to follow the recommended maintenance schedule for your Honda Accord. Regular battery checks, alternator inspections, and keeping the wiring connections clean and secure can help avoid potential problems.
Taking action: If you notice the “Check Charge System” light illuminating, it’s recommended to stop driving as soon as it’s safe to do so. Continuing to drive with a faulty charging system can lead to further damage and potential safety hazards.
Key Takeaways
– Ignoring the “Check Charge System” light can lead to complications
– Common causes include a faulty alternator, weak battery, or wiring issues
– Consult a certified mechanic for accurate diagnosis and repair
– Follow the maintenance schedule to prevent charging system issues
– Take immediate action and stop driving when the light comes on
Jack Oliver, is a car enthusiast with a keen eye for choosing the perfect accessories for cars and conducting thorough testing of various automotive products. Jack’s expertise lies in exploring the world of oils, lubricants, additives, and other accessories that enhance the performance, aesthetics, and overall driving experience.


Leave a Reply